Proper Way To Flash A Chimney


Next install waterproof building paper over the sheathing and flashing as a counter-flashing see illustration at right.
Proper way to flash a chimney. For starters you have to be comfortable working on a roof. About Press Copyright Contact us Creators Advertise Developers Terms Privacy Policy Safety How YouTube works Test new features 2020. The proper way to counter-flash a chimney is to insert the counterflashing into a raked joint left.
Caulk provides a secondary line of defense against moisture intrusion. And Mike the base flashing goes under the roofing shingles and up against the side of the chimney. As you fold down each piece cement it to the previous piece at the vertical joint using.
On a chimney flashing is required at the bottom the sides and the top. The flash is usually let in when the chimney is laid up. Sections of L-shaped sheet metal are woven into the shingle courses and lapped up the side of the chimney.
Position the piece of flashing across the lower face of the chimney with each end extending the same distance past the outer edges of the chimney and the lower edge overlapping the base flashing. Then you have to measure cut and bend sheet metal to fit precisely around the chimney and layer all the parts so they shed water. Then either mortar the flashing in place or thoroughly caulk it with silicone material.
The first piece of flashing should be placed directly below the chimney crown extend through the brick wythe and turn up against the outer face of the flue liner. And then the counter flashing is notched ph into the mortar joint and then it. Water should run down the side of the flashing and be directed to the shingles instead of finding its way into the roof deck.
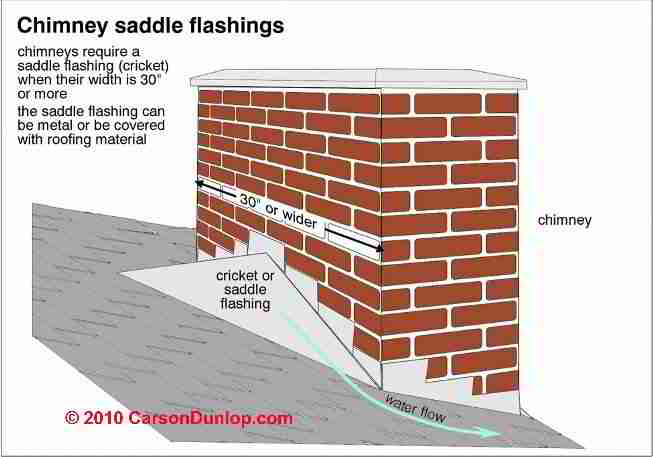
For chimneys wider than 30 there should be a saddle flashing installed. You have base flashing and counter flashing. A small bend in the horizontal leg of the flashing ensures that no water can run behind the flashing.
The best way is to build and sheathe the chimney then flash to the sheathing with the same step flashing thats recommended for a brick chimney. Depending on the slope of the roof each step will jump up one or two mortar joints and should lap over the previous piece of flashing at least 4 in. TOOLS You Will NEED for Roofing from AmazonBostitch Coil Nailer httpsamznto2U1v8E2Shingle Remover httpsamznto2FzU5wfRoof Snake httpsamznto.
Extend this mark around both front corners about 6 in. Each piece of step flashing going up the chimney should overlap the lower piece by at least 1-12 in. Proper flashing around a chimney includes two layers.
Saddle flashing creates a peak that allows water and snow to run off and prevents it from building up on your roof and chimney. However bottom flashings and top flashings where there is no saddle often are one piece. But on rework we cut in new reglets with a 4 or 5 grinder or cutoff wheel.
Its purpose is to seal off the top of the base flashing. Remove all metal and shingle work around the chimney down to the wood deck Install a rubberized membrane called Ice Watershield 18 around the chimney returning 6 up the chimney wall. Start at the front of the chimney and mark the third mortar joint up from the roof.
A second piece of flash-. The corners are especially vulnerable. Flashing is installed to surround roof features such as vents chimneys and skylights.
Each of these ideally would have a base step if its on the sides flashing and a cap counter flashing. Tips on Flashing a Chimney Part 1 on a shingle roof. This is the proper way to flash a chimney.
To secure the step flashing in the bed joints cut small wood shims and temporarily wedge the flashing into place. The first is called step flashing. Flashing a chimney is an advanced DIY project.
Vent water from entering the space between the chimney wall and the flue liner. The proper way to flash a chimney is with a two-piece flashing system. A second layer of metal is embedded in the chimney mortar joints and folded down to cover the top of the step flashing.
Counter flashing is bent down and installed in the mortar joints of your chimney. Next comes the counterflashing. Mark straight across the back of the chimney.
Even so if youre handy with tools and carefully follow our instructions and diagrams youll be able to flash your chimney in a day and by doing it yourself save several. Now mark the mortar joints on the sides of the chimney so the flashing steps up until you reach the back Photo 11.